Introduction
Canopy Wave supports a set of REST API to enable servers to develop management clients or to integrate VMS functionality into users' own custom management infrastructure.
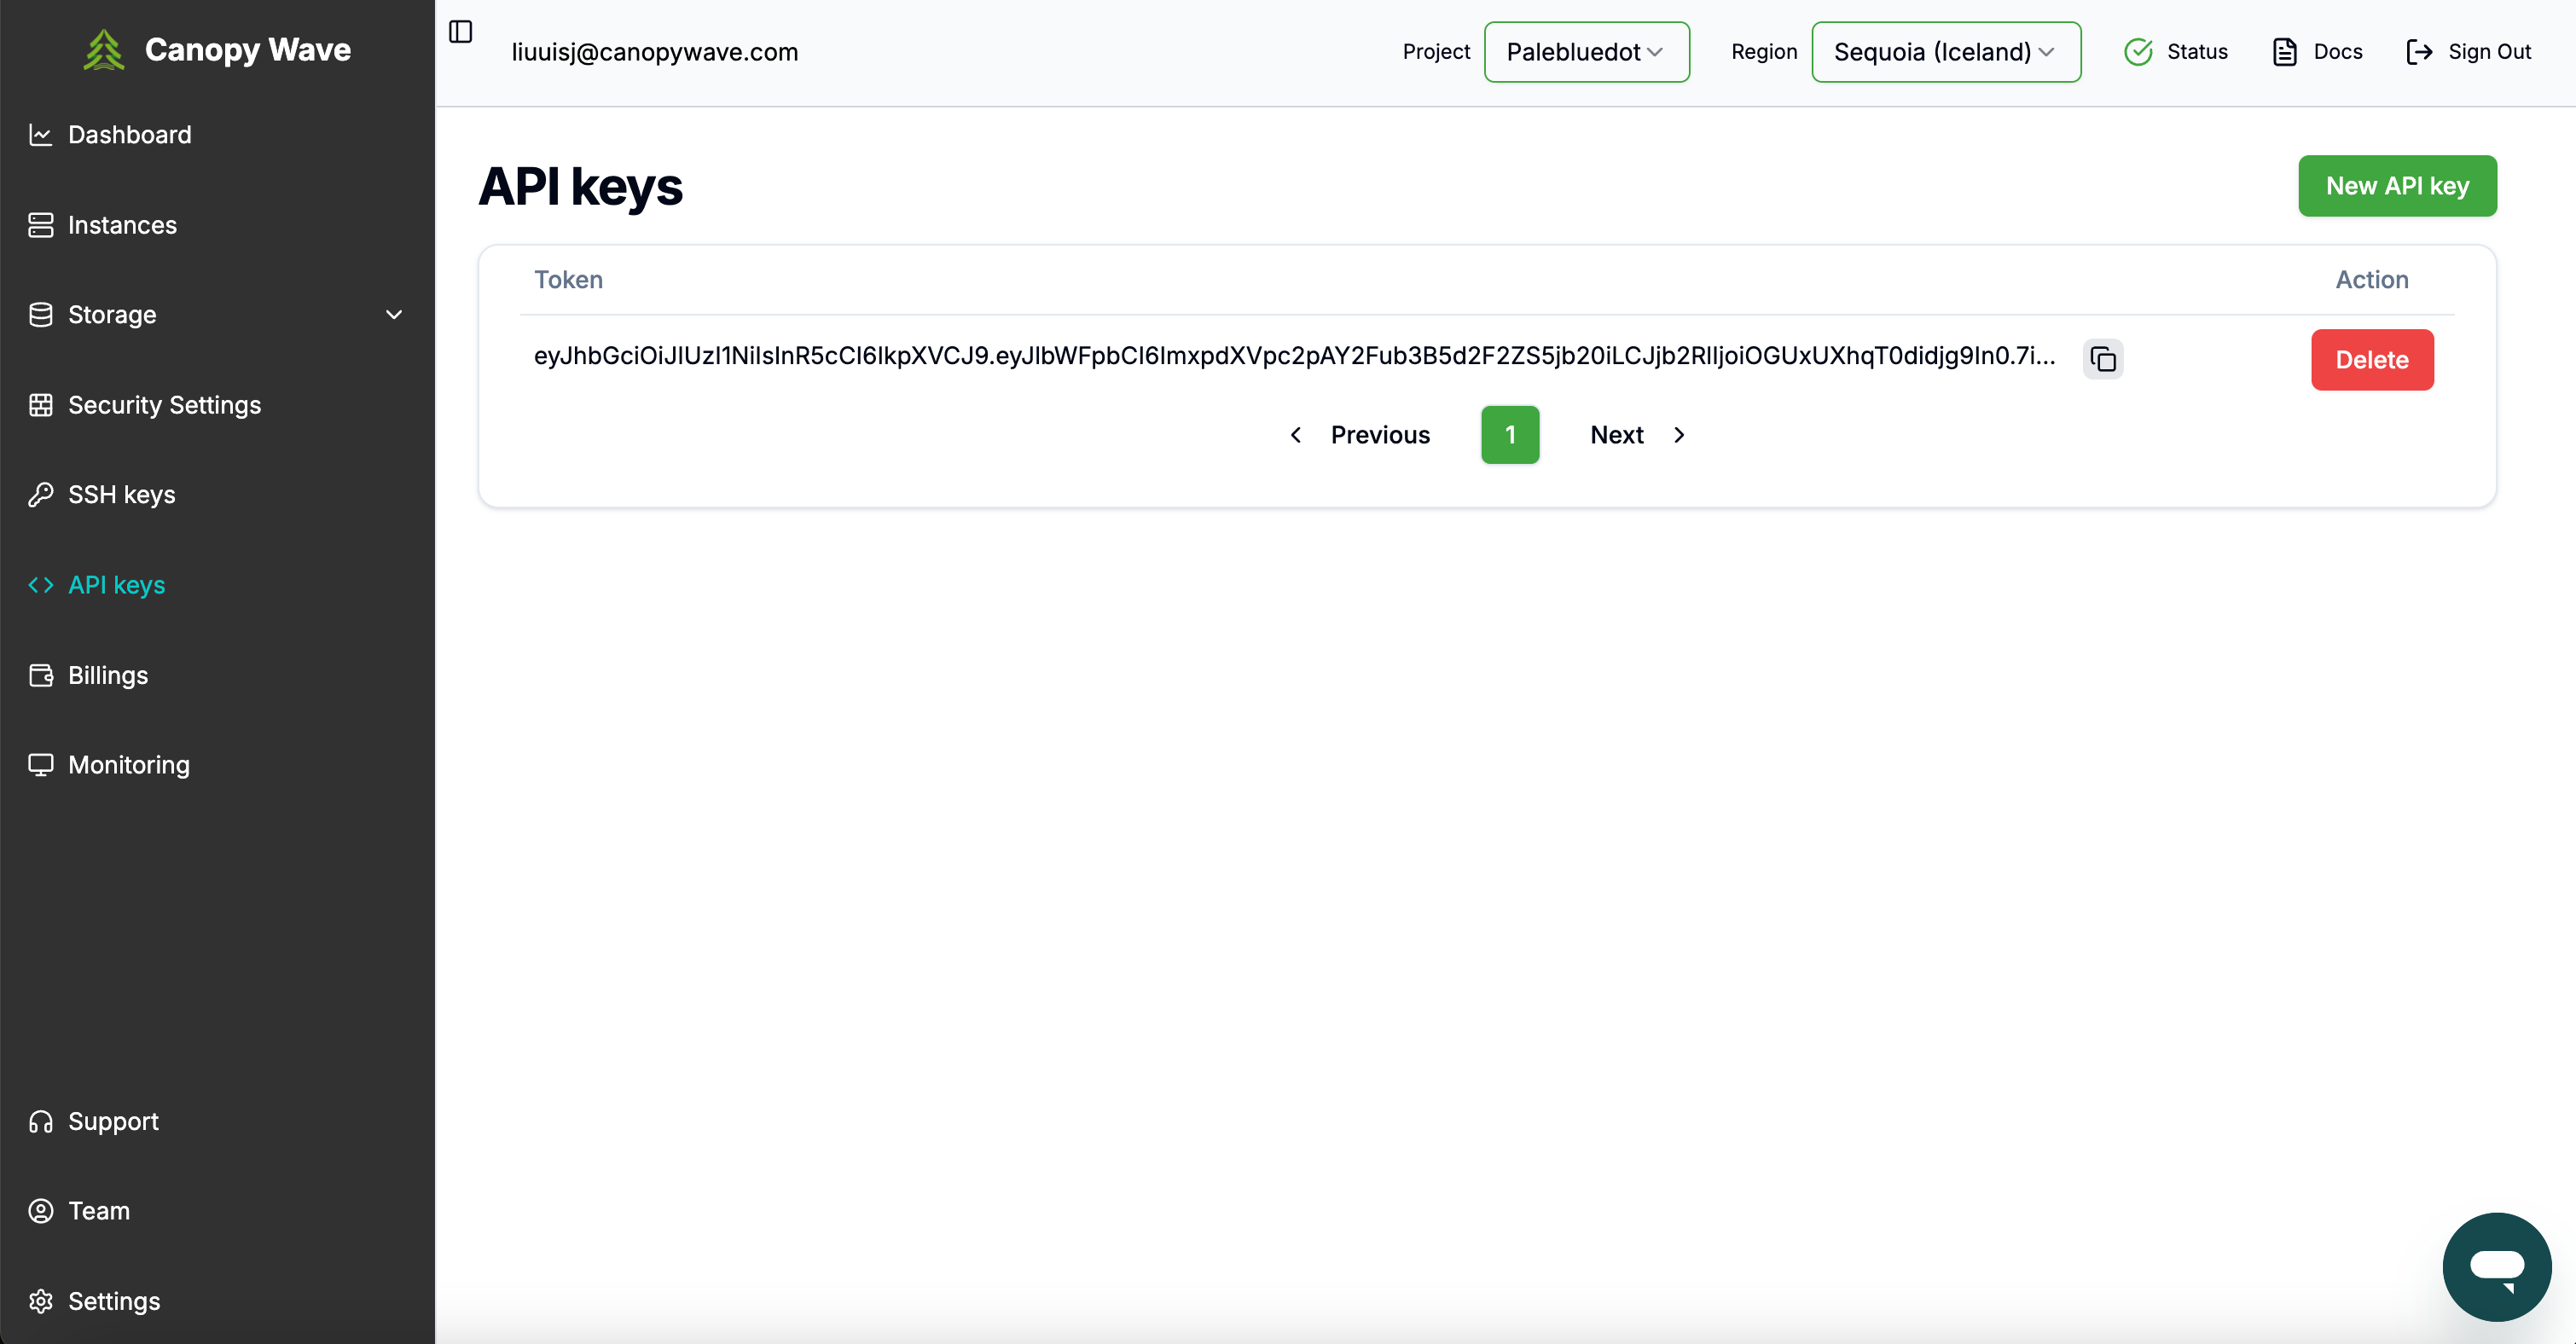
Obtaining an API Key
To manage Canopy Wave Cloud via the API, users must first register for an account at Canopy Wave (https://cloud.canopywave.io). After registering, follow these steps to generate an API key.
- In the left navigation bar, click on API Keys.
- Click on New API Key to create a new key.
- Copy the generated API key for use in future API calls.
Making an API Call
To make a request to the API, include an HTTP Bearer header with your API key:
Authorization: Bearer <YOUR-API-KEY>A successful API call will return the following structure:
{
  "data": "<PAYLOAD>"
}
If the API call is invalid, an error Reply will be returned. For example, a 401 Unauthorized error indicates that the request was not authorized:
401: UnauthorizedThe error Reply will include an error message, formatted as follows:
{
  "error": "<error message>"
}
REST API Endpoints
https://cloud-api.canopywave.io/api/v1/projectsThis will return the list of names of the projects you have permission to access. Many API calls will require project as a parameter
{
  "data": [
    "andrew.li@canopywave.com",
    "cynthia@canopywave.com"
  ]
}https://cloud-api.canopywave.io/api/v1/instances- project - Specifies the project
- region - Specifies the data center
Returns a list of instances in the specified region. If no region is specified, returns all instances across all regions
{
  "data": [
    {
      "flavor": "2x H100 (80 GB SXM5)",
      "id": "9bc56d2b-411b-47c3-b93a-691c3931009c",
      "launchedAt": "2025-05-24T01:17:09.000000",
      "name": "cynthia-2",
      "paymentMode": null,
      "publicIp": null,
      "region": "sequoia",
      "role": "worker",
      "status": "active"
    },
    {
      "flavor": "16 vCPU x86 Server",
      "id": "36346e91-90db-4c38-97cd-bf94e4a138ce",
      "launchedAt": "2025-05-24T00:45:10.000000",
      "name": "cynthia-test-snapshot",
      "paymentMode": null,
      "publicIp": null,
      "region": "sequoia",
      "role": "worker",
      "status": "active"
    },
    {
      "flavor": "4x H100 (80 GB SXM5)",
      "id": "730dcf5a-bada-45f3-9a32-e8657cf7b200",
      "launchedAt": null,
      "name": "cynthia-4",
      "paymentMode": null,
      "publicIp": null,
      "region": "sequoia",
      "role": "worker",
      "status": "error"
    }
  ]
}https://cloud-api.canopywave.io/api/v1/instances/running- project - Specifies the project
- region - Specifies the data center
Returns all active instances for the specified region
{
  "data": [
    {
      "flavor": "2x H100 (80 GB SXM5)",
      "id": "9bc56d2b-411b-47c3-b93a-691c3931009c",
      "launchedAt": "2025-05-24T01:17:09.000000",
      "name": "cynthia-2",
      "paymentMode": null,
      "publicIp": "213.181.122.171",
      "region": "sequoia",
      "role": "worker",
      "status": "active"
    },
    {
      "flavor": "16 vCPU x86 Server",
      "id": "36346e91-90db-4c38-97cd-bf94e4a138ce",
      "launchedAt": "2025-05-24T00:45:10.000000",
      "name": "cynthia-test-snapshot",
      "paymentMode": null,
      "publicIp": null,
      "region": "sequoia",
      "role": "worker",
      "status": "active"
    }
  ]
}https://cloud-api.canopywave.io/api/v1/instances/<instance-id>- region - Specifies the data center
- project - Specifies the project
Returns the details of specified instance
{
  "data": {
    "OS-DCF:diskConfig": "MANUAL",
    "OS-EXT-AZ:availability_zone": "nova",
    "OS-EXT-SRV-ATTR:host": "h1-31-gpu",
    "OS-EXT-SRV-ATTR:hypervisor_hostname": "h1-31-gpu",
    "OS-EXT-SRV-ATTR:instance_name": "instance-00001bc9",
    "OS-EXT-STS:power_state": 1,
    "OS-EXT-STS:task_state": null,
    "OS-EXT-STS:vm_state": "active",
    "OS-SRV-USG:launched_at": "2025-05-24T01:17:09.000000",
    "OS-SRV-USG:terminated_at": null,
    "accessIPv4": "",
    "accessIPv6": "",
    "addresses": {
      "cynthia_canopywave_com-network": [
        {
          "OS-EXT-IPS-MAC:mac_addr": "fa:16:3e:9d:aa:19",
          "OS-EXT-IPS:type": "fixed",
          "addr": "172.16.0.252",
          "version": 4
        }
      ]
    },
    "config_drive": "",
    "created": "2025-05-24T01:15:50Z",
    "flavor": {
      "id": "7c7f97b0-b80f-44dc-859d-71e04834b1cc",
      "links": [
        {
          "href": "http://213.181.122.220:8774/flavors/7c7f97b0-b80f-44dc-859d-71e04834b1cc",
          "rel": "bookmark"
        }
      ]
    },
    "hostid": "421e003d15a3a862186597aae14c6e19d0ec66ffe8093222f71b59c5",
    "id": "9bc56d2b-411b-47c3-b93a-691c3931009c",
    "image": {
      "id": "66d16f9e-f984-4738-a170-97457ecfe4b6",
      "links": [
        {
          "href": "http://213.181.122.220:8774/images/66d16f9e-f984-4738-a170-97457ecfe4b6",
          "rel": "bookmark"
        }
      ]
    },
    "key_name": null,
    "links": [
      {
        "href": "http://213.181.122.220:8774/v2.1/servers/9bc56d2b-411b-47c3-b93a-691c3931009c",
        "rel": "self"
      },
      {
        "href": "http://213.181.122.220:8774/servers/9bc56d2b-411b-47c3-b93a-691c3931009c",
        "rel": "bookmark"
      }
    ],
    "metadata": {},
    "name": "cynthia-2",
    "os-extended-volumes:volumes_attached": [],
    "progress": 0,
    "security_groups": [
      {
        "name": "ssh"
      },
      {
        "name": "default"
      },
      {
        "name": "monitoring"
      }
    ],
    "status": "ACTIVE",
    "tenant_id": "a6a0dcd9c8764726b4ede6569fc26568",
    "updated": "2025-05-24T01:17:09Z",
    "user_id": "b7ef9befa66d456b866fa09603694b4a"
  }
}https://cloud-api.canopywave.io/api/v1/images- project - Specifies the project
Return all OS images that are available for the instance
{
  "data": [
    "CPU-Ubuntu.22.04",
    "GPU-Ubuntu.24.04",
    "GPU-Ubuntu.22.04",
    "CPU-Ubuntu.24.04"
  ]
}https://cloud-api.canopywave.io/api/v1/instance-types- project - Specifies the project
Returns a list of instance types the specified project has access to.
{
  "data": [
    {
      "flavor": "H100-4",
      "images": [
        "GPU-Ubuntu.22.04",
        "GPU-Ubuntu.24.04"
      ],
      "name": "4x H100 (80 GB SXM5)",
      "price": 900,
      "priceHour": "$2.25 / gpu / hour",
      "specs": "80 cores, 800.0 GB RAM, 2 TB NVMe"
    },
    {
      "flavor": "H100-8",
      "images": [
        "GPU-Ubuntu.22.04",
        "GPU-Ubuntu.24.04"
      ],
      "name": "8x H100 (80 GB SXM5)",
      "price": 1800,
      "priceHour": "$2.25 / gpu / hour",
      "specs": "160 cores, 1536.0 GB RAM, 17 TB NVMe"
    },
    {
      "flavor": "m1.advanced",
      "images": [
        "CPU-Ubuntu.22.04",
        "CPU-Ubuntu.24.04"
      ],
      "name": "16 vCPU x86 Server",
      "price": 56,
      "priceHour": "$0.035 / cpu / hour",
      "specs": "16 cores, 32.0 GB RAM, 500 GB SSD"
    },
    {
      "flavor": "H200-8",
      "images": [
        "GPU-Ubuntu.22.04",
        "GPU-Ubuntu.24.04"
      ],
      "name": "8x H200 (80 GB SXM5)",
      "price": 1800,
      "priceHour": "$3.00 / gpu / hour",
      "specs": "160 cores, 1536.0 GB RAM, 17 TB NVMe"
    }
  ]
}https://cloud-api.canopywave.io/api/v1/regions- project - Specifies the project
{
  "data": [
    "KEF-1",
    "KEF-2"
  ]
}https://cloud-api.canopywave.io/api/v1/flavor-availability- project - Specifies the project
- flavor - Specifies the type of instance
- region - Specifies the data center
GET https://cloud-api.canopywave.io/api/v1/flavor-availability?project=Canopy Wave®ion=KEF-2&flavor=H100-8Return the number of available instances of the given flavor in the given data center. This number is limited by the number of available public IPs to ensure that every provisioned VM can be assigned a public IP address.
{
  "KEF-2_H100-8_available_vms": 10
}https://cloud-api.canopywave.io/api/v1/instance-operations/launch- region: Specifies the data center
- project: Specifies the project
- name: A unique identifier for the instance
- flavor: Defines the type of instance
- image: The operating system to be used
- password: The password for default SSH login
- keypair: The key used for SSH access
- is_monitoring: Enables the monitoring page for the instance
Returns the id of the new instance
{
  "region": "your-region",
  "project": "your-project",
  "name": "your-instance-name",
  "flavor": "your-selected-flavor",
  "image": "your-selected-image",
  "password": "your-password"
}- keypair: The key used for SSH access
- is_monitoring: Enables the monitoring page for the instance
{
  "keypair": "your-key-name",
  "is_monitoring": true
}
{
"data": {
"id": "e0ad011b-c690-4ab6-adc1-35187efff1d5"
}
}A 200 OK status code from this endpoint acknowledges that the VM instance has begun spawning. To reliably proceed to your next step, send a GET request to https://cloud-api.canopywave.io/api/v1/instances/<instance-id> and ensure that the status field is 'ACTIVE'.
https://cloud-api.canopywave.io/api/v1/instance-operations/restart- region: Specifies the data center
- project: Specifies the project
- id: The instance id
Returns the id of the restarted instance
{
  "region": "your-region",
  "project": "your-project",
  "id": "your-instance-id"
}
{
"data": {
"id": "e0ad011b-c690-4ab6-adc1-35187efff1d5"
}
}https://cloud-api.canopywave.io/api/v1/instance-operations/terminate- region: Specifies the data center
- project: Specifies the project
- id: The instance id
Returns the id of the terminated instance
{
  "region": "your-region",
  "project": "your-project",
  "id": "your-instance-id"
}
{
"project": "cynthia@canopywave.com",
"region": "KEF-2",
"id": "0952989f-8ed0-4228-8526-efff1a6b02bb0b4"
}https://cloud-api.canopywave.io/api/v1/ssh-keys- region - Specifies the data center
- project - Specifies the project
Return a list of ssh-keys for the specified region
{
  "data": [
    {
      "keypair": {
        "fingerprint": "bd:37:33:4d:8a:77:54:d3:f8:07:51:26:e2:9d:e7:db",
        "name": "cynthia-key-1",
        "public_key": "ssh-ed25519 AAAAC3NzaC1lZDI1NTE5AAAAIMy/6SeyjtenrEyUDS4b7LBMCphEOPQu1tcnWGE7keZe andrew.li@canopywave.com"
      }
    },
    {
      "keypair": {
        "fingerprint": "20:65:c6:e6:06:fb:1e:50:e2:1b:10:c1:e0:36:08:3f",
        "name": "cynthia-key-test-generate-key-pair",
        "public_key": "ssh-rsa AAAAB3NzaC1yc2EAAAADAQABAAABAQCwo/sYPYxyE3fS2PqGq/pJAEfLuphL+u87Z5oDJJoBipNUiyLFWveX6yYCXTjiyfXu6J+VBzHhzx1lTFqqAQqsF1K/TD5/z6GBHnl0NsL4/FG0xmqYIzCGnGD3BN6NSlR4si1H7Jl0CZluXR2Oo37JHUA7V+wDjO1p8WVJVveiI1s20zsQPQOI4Zpc/1UOiS8NgK430k2Up9kqFxV5ory9bvz4QKN7LyabRAgTWtOsLIWD2hEpi6SZOf3MXiwL4c9KOWyheE5/y/38bcep000cTWjsx42v23B88BDuJzDTwPuZrLN7J2Ktk2V"
      }
    },
    {
      "keypair": {
        "fingerprint": "45:2e:fc:23:b2:11:9a:41:77:6f:3c:20:0d:d4:dc:0a",
        "name": "cynthia-key-2",
        "public_key": "ssh-rsa AAAAB3NzaC1yc2EAAAADAQABAAABAQCi716NkC1Ir9JbIYeBidS3ZvVNkArxUDybahX94weqlDGsxJFlz01bdO7HiA7I2QIocbUqD1I+LNEtMqFi63lr0GQAWhcwGL+/R2RpCNLj5y0VxMCIOYOmEh01qZ7zq2UJn9IvuvU5WD5cSSJrQnXLo1mdYM/eeNrr4NKOY+aoCdmI6gCO44wegG/f8nAMV+zyNw8i+duZXBsZMQTT29TgxcESGTYBY7TOc8WE/MlnbfNo9EHZ8ygYkDNQbfOE5ZcjqkXdHJqFJNyZfa1ko8RcIfltCNNprQLrrP4Qgaf1feaXnvaHUEHArE9"
      }
    }
  ]
}https://cloud-api.canopywave.io/api/v1/ssh-keys- region: Specifies the data center
- project: Specifies the project
- name: Name of the new key
- publicKey: If you want to import your key, enter your public key here
If the optional parameter is provided, return the public key you imported.
{
  "region": "your-region",
  "project": "your-project",
  "name": "your-key-name"
}- publicKey: If you want to import your key, enter your public key here
{
  "publicKey": "ssh-rsa xxxxxxxxxxxxxxx"
}
{
"data": {
"privateKey": "-----BEGIN RSA PRIVATE KEY-----\nMIIEowIBAAKCAQEAou9ejZAtSK/SWyGHgYnUt2b1TZAK8VA8m2oV/eMHqpQxrMSR\nZc9NW3Tux4gOyNkCKHG1Kg9SPizRLTKhYut5a9BkAFoXMBi/v0dkaQjS4+/Dm6P0LSY6UmUTsBw\nTML8wArAnk7upfvb6rKaGxlYBGwKu/yH45I+/Xd\n-----END RSA PRIVATE KEY-----\n",
"publicKey": "ssh-rsa AAAAB3NzaC1yc2EAAAADAQABAAABAQCi716NkC1Ir9JbIYeBidS3ZvVNkArxUDybahX94weqlDGsxJFlz01bdO7HiA7I2QIocbUqD1I+Y+aoCdmI6gCO44wegG/f8nAMV+zyNw8i+duZXBsZMQTT29TgxcESGTYBY7TOc8WE/MlnbfNo9EHZ8ygYkDNQbfOE5ZcjqkXdHJqFJNyZfa1ko8RcIfltCNNprQLrrP4Qgaf1feaXnvaHUEHArE9neDudxyyNtUjEi8038RVEOnWzvweP"
}
}https://cloud-api.canopywave.io/api/v1/ssh-keys/<key-name>- region - Specifies the data center
- project - Specifies the project
Return the id of the ssh-key
{
  "data": {
    "name": "ddrgdfg"
  }
}https://cloud-api.canopywave.io/api/v1/file-systems- region - Specifies the data center
- project - Specifies the project
Returns a list of all file systems for the specified region
https://cloud-api.canopywave.io/api/v1/file-systems- region: Specifies the data center
- project: Specifies the project
- name: Define for identification
- size: The size for file system in GB
Return the id the file system
{
  "region": "your-region",
  "project": "your-project",
  "name": "your-share-fileSys-name",
  "size": "your-selected size"
}https://cloud-api.canopywave.io/api/v1/file-systems/<id>- region - Specifies the data center
- project - Specifies the project
Return the ID of the file system
https://cloud-api.canopywave.io/api/v1/volumes- region - Specifies the data center
- project - Specifies the project
Return a list of ALL volumes for the specified region
https://cloud-api.canopywave.io/api/v1/volumes- region: Specifies the data center
- project: Specifies the project
- name: Define for identification
- type: The type of storage
- size: The size for the volume in GB
Returns the id of the new volume
{
  "region": "your-region",
  "project": "your-project",
  "name": "your-volume-name",
  "type": "hdd",
  "size": "your-selected size"
}
{
"data": {
"id": "c585949f-f88e-4515-b60e-6e6a6ff0da89"
}
}https://cloud-api.canopywave.io/api/v1/volumes/<volume-id>- region - Specifies the data center
- project - Specifies the project
Returns the id of the deleted volume
{
  "data": {
    "id": "c585949f-f88e-4515-b60e-6e6a6ff0da89"
  }
}https://cloud-api.canopywave.io/api/v1/ips- region:The available data center
- project:Specifies the project
Return a list of of IP address objects
{
  "data": [
    {
      "id": "09e40279-e757-461f-a6e7-82829aba8536",
      "ip": "213.181.122.171",
      "server": "cynthia-2",
      "serverId": "15876dc7-17cf-4284-973e-324c3543751a",
      "status": "ACTIVE"
    },
    {
      "id": "5bb56a56-372f-41ff-b746-52460f03e99d",
      "ip": "213.181.122.206",
      "server": null,
      "serverId": null,
      "status": "DOWN"
    }
  ]
}https://cloud-api.canopywave.io/api/v1/ips- region: The available data center
- project: Specifies the project
Object containing id and ip of newly-allocated IP address
{
  "data": {
    "id": "d3889c71-72b0-43bd-8ab5-7c8091264cf9",
    "ip": "213.181.122.218"
  }
}https://cloud-api.canopywave.io/api/v1/ips/<ipId>/associate- region: The available data center
- project: Specifies the project
- instanceId: The ID of the instance to associate the IP with
<ipId>: the id of ip you get in 21. GEThttps://cloud-api.canopywave.io/api/v1/ips
Object containing IDs of the IP, port, and instance
{
  "data": {
    "instanceId": "9bc56d2b-411b-47c3-b93a-691c3931009c",
    "ipId": "09e40279-e757-461f-a6e7-82829aba8536",
    "portId": "e56bc512-14a0-4ecd-9480-ca83f8695c4c"
  }
}https://cloud-api.canopywave.io/api/v1/ips/<ipId>/disassociate- region : Specifies the data center
- project : Specifies the project
Object containing ID of the IP
{
  "data": {
    "id": "09e40279-e757-461f-a6e7-82829aba8536"
  }
}https://cloud-api.canopywave.io/api/v1/ips/<id>- region : Specifies the data center
- project : Specifies the project
ID of the released address
{
  "data": {
    "id": "09e40279-e757-461f-a6e7-82829aba8536"
  }
}