OpenClaw Deployment Guide
(With Third-Party API Interactive Configuration)
1. System Requirements
- OS: macOS, Linux, Windows (On Windows, we strongly recommend running OpenClaw under WSL2)
- Node.js: Version ≥ 22
- NPM: Bundled with Node.js installation
2. Discord Bot Configuration
- Go to Discord Developer Portal and create a new application
- Navigate to the Bot tab and enable the following Intents:
- Message Content
- Server Members
- Presence
- Copy the Bot Token (save it for Step 4)
- Use the OAuth2 URL Generator to create an invite link and add the bot to your server
- Obtain the Channel ID of your target channel (Right-click channel → Copy ID; Developer Mode must be enabled)
3. Installation
Install using the official script (auto-detects OS, installs Node.js if missing, and launches the configuration wizard):
curl -fsSL https://openclaw.ai/install.sh | bashThe installer will automatically:
- Install the OpenClaw CLI
- Launch the interactive onboarding wizard
- Install the daemon (background service) for 24/7 operation
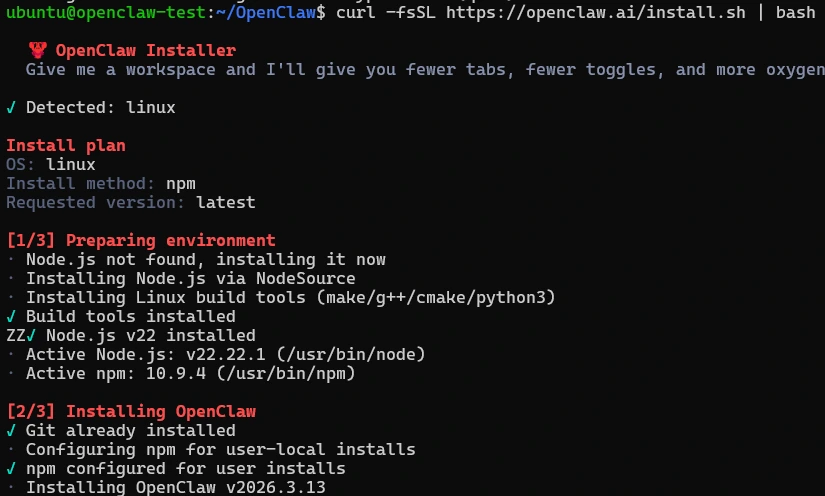
Troubleshooting: If you encounter permission errors, use sudo or verify that curl is installed.
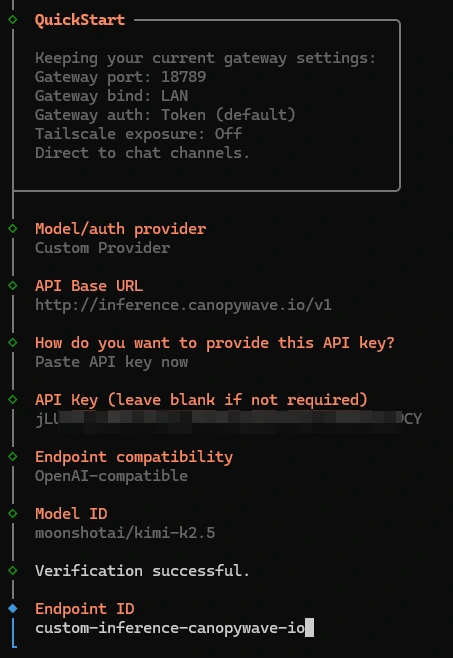
4. Configure Third-Party API (Canopy Wave, etc.)
New: OpenClaw now supports interactive configuration of OpenAI-compatible third-party APIs directly in the onboarding wizard—no manual file editing required.
Interactive Wizard Setup
After running the install script or executing openclaw onboard, follow these steps:
- Gateway Settings: Keep defaults or modify port/authentication as needed
- Select Model Provider: Choose Custom Provider
- API Base URL: Enter your third-party API endpoint
https://api.canopywave.io/v1 - API Key Method: Select Paste API key now
- Enter API Key: Paste your Canopy Wave (or other provider) API key
- Endpoint Compatibility: Select OpenAI-compatible
- Model ID: Enter the model identifier
moonshotai/kimi-k2.5 - Verification: The system will verify the connection and display Verification successful
- Endpoint ID: Auto-generated (e.g., custom-inference-canopywave-io), no manual input required
Adding Additional Models
To add more models from the same provider, or to add other providers later:
openclaw onboard --add-modelAlternative: Manual Configuration (Advanced)
If you need to manually edit the configuration file (located at ~/.openclaw/openclaw.json), use this structure:
"models": {
  "mode": "merge",
  "providers": {
    "canopywave": {
      "baseUrl": "https://api.canopywave.io/v1",
      "apiKey": "your-api-key",
      "api": "openai-completions",
      "models": [
        {
          "id": "moonshotai/kimi-k2.5",
          "name": "Kimi K2.5",
          "reasoning": true,
          "contextWindow": 204800,
          "maxTokens": 8192
        }
      ]
    }
  }
}
Validate configuration:
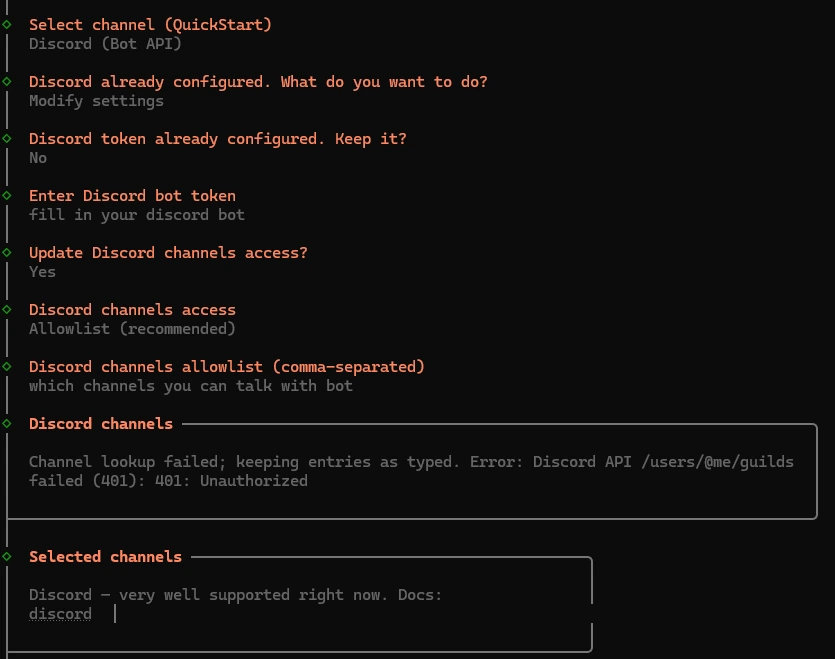
openclaw doctor5. Configure Communication Channels (Discord)
During the wizard or subsequent configuration:
- Select Platform: Discord / Telegram / WhatsApp (Discord for this guide)
- Enter Bot Token: Paste the Discord Bot Token from Step 2
- Set Channels: Enter allowed Channel IDs (comma-separated for multiple)
- Permission Setup: Restrict allowedUsers to your Discord ID only (recommended)
6. Startup & Testing
# Start the gateway (background service)
openclaw gateway start

# Check gateway status
openclaw gateway status

# Launch interactive TUI
openclaw tui

# Diagnose and auto-fix issues
openclaw doctor --fix
Testing Workflow
- @mention the bot or send a message in the configured Discord channel
- Verify that the bot successfully calls the Canopy Wave API and returns a response
7. Updates & Maintenance
# Update to latest stable version
openclaw update --channel stable

# View real-time logs
openclaw logs --follow

# Complete uninstallation
npm uninstall -g openclaw && rm -rf ~/.openclaw
8. Security Best Practices
- User Restriction: Strictly limit the allowedUsers field in your channel configuration to your Discord ID only, preventing unauthorized access.
- Key Protection: Store API keys securely to prevent exposure. Immediately rotate (revoke and regenerate) any keys that have been leaked or compromised.
- Public Access: When exposing the Gateway to the public internet, ensure your Token remains confidential and enable device authentication to restrict access to authorized devices only. Never grant access to unknown or untrusted devices.
9. Troubleshooting
| Issue | Solution |
|---|---|
| Low Node Version | Upgrade to Node.js 22+: nvm install 22 or download from official website |
| API Not Responding | Verify API Key and Base URL; check provider service status |
| Windows Compatibility | Use WSL2 instead of native Windows environment |
| Daemon Not Running | Check systemd/launchd status: systemctl --user status openclawWSL2 requires systemd to be enabled |
| Model Not Found | Run openclaw doctor to validate config; check Model ID spelling |
Tip: After initial setup, you can modify settings anytime using openclaw config, or re-run openclaw onboard to add new model providers.